Create Parcels behind the Front lot line
When the lot is not wide enough, and you want to cut it into a single row of parcels, you can use ‘Divide parcel using Front lot line’ from SPCAD cadaster management tools.

Initial setup
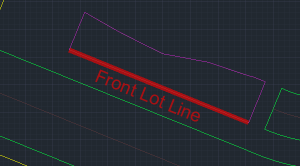
CAD users often encounter scenarios in lot subdivisions where thin lots need division into single rows of parcels. SPCAD provides separate tools to handle these conditions. To start the procedure, draw a front line first. The front lot line runs along the edge of the lot polygon and serves as the cutting edge. Draw this line before using the tool. Make sure it is an open (NOT closed) Polyline object. Do not use a 3D Polyline or arc object directly. If you have a 2D or 3D Polyline or an arc object, convert it into a Polyline object using SPCAD’s Convert to Polyline function. When using an arc object to mark the entire lot width line or a portion of it, convert it before proceeding.
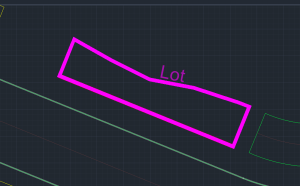
Any closed polyline can be considered as the lot.
Please ensure that the “Front lot line” remains within the lot polygon. It can be positioned along the cutting edge or slightly inside the polygon. Ensure assigning a coordinate system to the drawing to avoid triggering a warning like the depicted one. This assignment is crucial for tasks such as area measurement, annotation, and exporting parcels to KML and shapefile.

Cutting parcels
After obtaining a valid lot polygon, a corresponding Front lot line, and assigning the coordinate system to the drawing, click the tool icon in the Cadaster panel or enter DDZ_SP in the command line. This action prompts the user to select the lot and the Front lot width line, after which a GUI will appear. Within this interface, you can independently manage parcel cutting.
Cutting Techniques
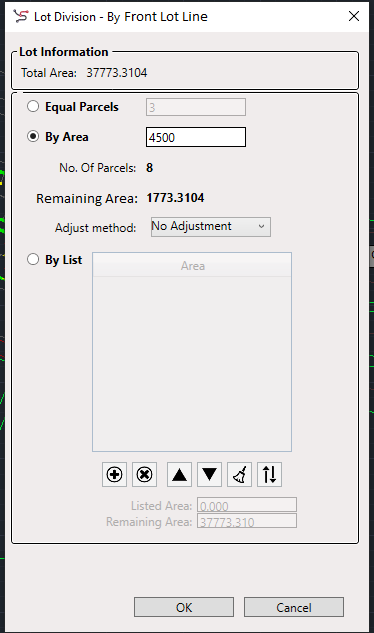
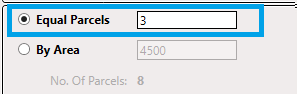
In this UI, you have the flexibility to divide a lot into parcels using three methods: Equal Parcels, By Area, and By List.
- Equal Parcels: Users can specify the desired number of parcels, and SPCAD will divide the lot into that number of parcels, ensuring equal area distribution among them.
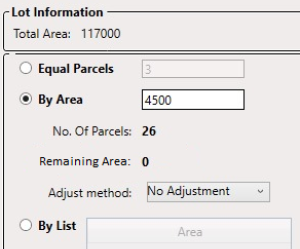
- By Area: Users can specify an area, and SPCAD will divide the lot into parcels, ensuring each parcel meets the specified area. If there’s a remainder after cutting, adjustment methods such as Both Side +, Both Side -, Only First, Only Last, or No adjustment can be applied.

Both Side +
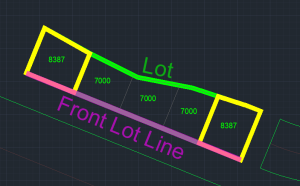
Suppose the total area equals 37,774 sq units, and you want each parcel to be 7,000 sq units. In this case, you can create 5 parcels, leaving 2,774 sq units of remaining area. If you then select the BOTH SIDE + option from the adjustment menu, the tool adds 1,387 sq units to both the first and the last parcels. As a result, these parcels become 8,387 sq units each, distributing the remaining area evenly.
Both side –
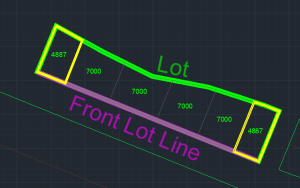
Suppose the total area is 37,774 square units, and we want to divide it into parcels of 7,000 square units each. Initially, this creates 5 parcels, leaving a remainder of 2,774 square units. When we select the “BothSide-” feature in SPCAD, the tool keeps 4 parcels at 7,000 square units each and dissolves the fifth parcel, which absorbs the remaining area. We then split the remaining 2,774 square units in half, creating two parcels of 1,387 square units each, positioned at both ends of the lot. As a result, we end up with 4 parcels of 7,000 square units and two additional parcels of 1,387 square units each at the start and end of the row.
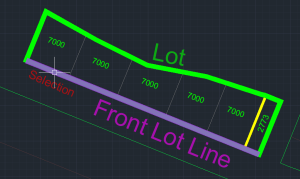
Only First
In this case, all the remaining area is added to the last parcel.
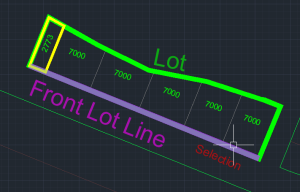
Only last
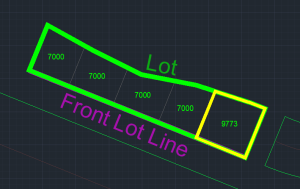
In this case, all the remaining area is added to the last parcel.

No adjustment
If you choose the ‘no adjustment’ option, the tool adds an extra parcel that includes the remaining area. Place this remaining area parcel on the side opposite the edge of the front lot line you initially selected.
- By List: Users specify parcel divisions by entering the desired areas in a list. They can add, delete, rearrange, or invert entries directly within the list interface.

Paste List
You can access all list operations by right-clicking on the list. Additionally, lists can be pasted from other applications (such as Excel or Notepad).

By following these steps and utilizing the various cutting techniques offered by SPCAD, CAD users can effectively handle thin lot subdivisions with precision and flexibility.


